Low Profile Paver Rail™
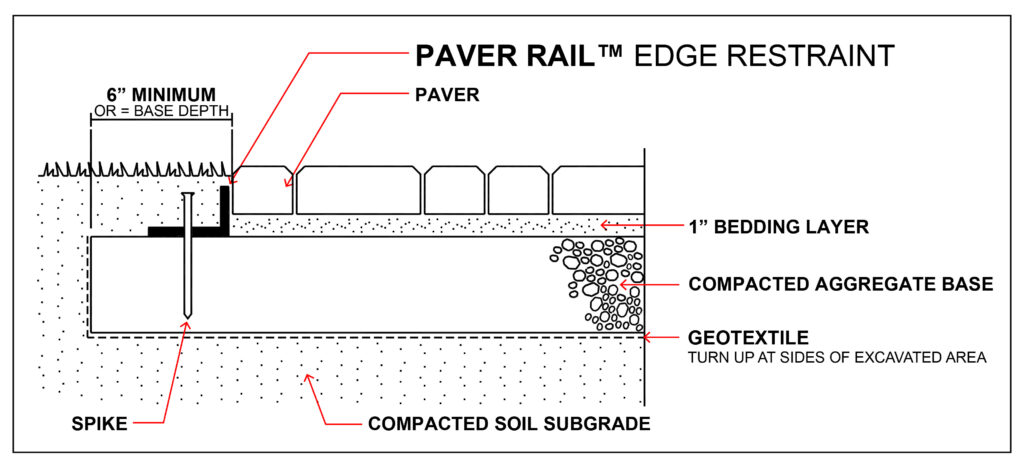
SRW Low Profile Paver Rail™ is professional grade paver rail edging that can be installed against wetcast or natural stone preventing erosion of bedding sand, and lateral shifting. The low-profile application is ideal for natural stone. Use with any SRW spikes, staples, or stakes for easy installation to save you time and money.

- Can be installed against wetcast or natural stone to prevent shifting
- Product height 1 – 3/16″
- Ideal for natural stone
- Low profile applications like natural stone
- For use with spikes, staples or stakes
Low Profile Paver Rail™ | Product height 1 – 3/16″
| PART NUMBER | SIZE | AMT PER CTN | QUANTITY |
| PRAIL UNIVLP | 7’8″ | 12/BNDL | 48 BNDLS/PLT |
CONTRACTORS: If you are a contractor looking to try one of our products, click here for a dealer in your area, or click here to connect with your local sales rep for a demo.
DEALERS: If you are a dealer looking for an in-store demo or to bring a product in, click here to find your local sales rep.
HOMEOWNERS: If you are a homeowner, click here to find a dealer in your area.
Low Profile Paver Rail™ Instructions
Installing Before Pavers
- Place Paver Rail™ on top of uniformly compacted graded gravel base per pavement design and secure edging with 10”/12” smooth or spiral landscape spikes.
Installing After Pavers
- Use a hand trowel to carefully pull back screeded sand from the edging area.
- Place Paver Rail™ firmly against the pavers and secure edging with 10”/12” smooth or spiral landscape spikes.
Joining Sections
- Join the sections by using a staple to adjoin the pieces. As shown in diagram (a).
Fastening
Holding the edging firmly against side of pavers, lightly tap the spike in part way to accommodate for edging adjustment if needed.
When finished adjusting, pound spikes down tight to the edging.
Secure edging with spikes every 12” – 24” apart or as needed on curves.
When backfilling with a non-compactible material, more spikes may be required for added support.
To Finish
- After all pavers are in place, sweep the surface to remove all debris.
- Using a plate compactor, make multiple passes over the entire area to set pavers.
- Sweep SRW Polymeric Sand<link to product category page> into joints until the joints are filled. Alternate compacting and sweeping sand into joints until the joints are solid.
- Backfill the outside of the edging with topsoil, sod, seed, or mulch.
- Use a SRW Products Cleaner to clean the surface and then seal with an SRW Products Sealer that are appropriate for surface.
Related products


Where can I buy SRW Paver Rail™?
How can I determine the best type of SRW Paver Rail™ Edging for my project?
How far apart should I drive spikes into the Paver Rail™ edging to secure it in place?
Do you have additional questions? Contact us.