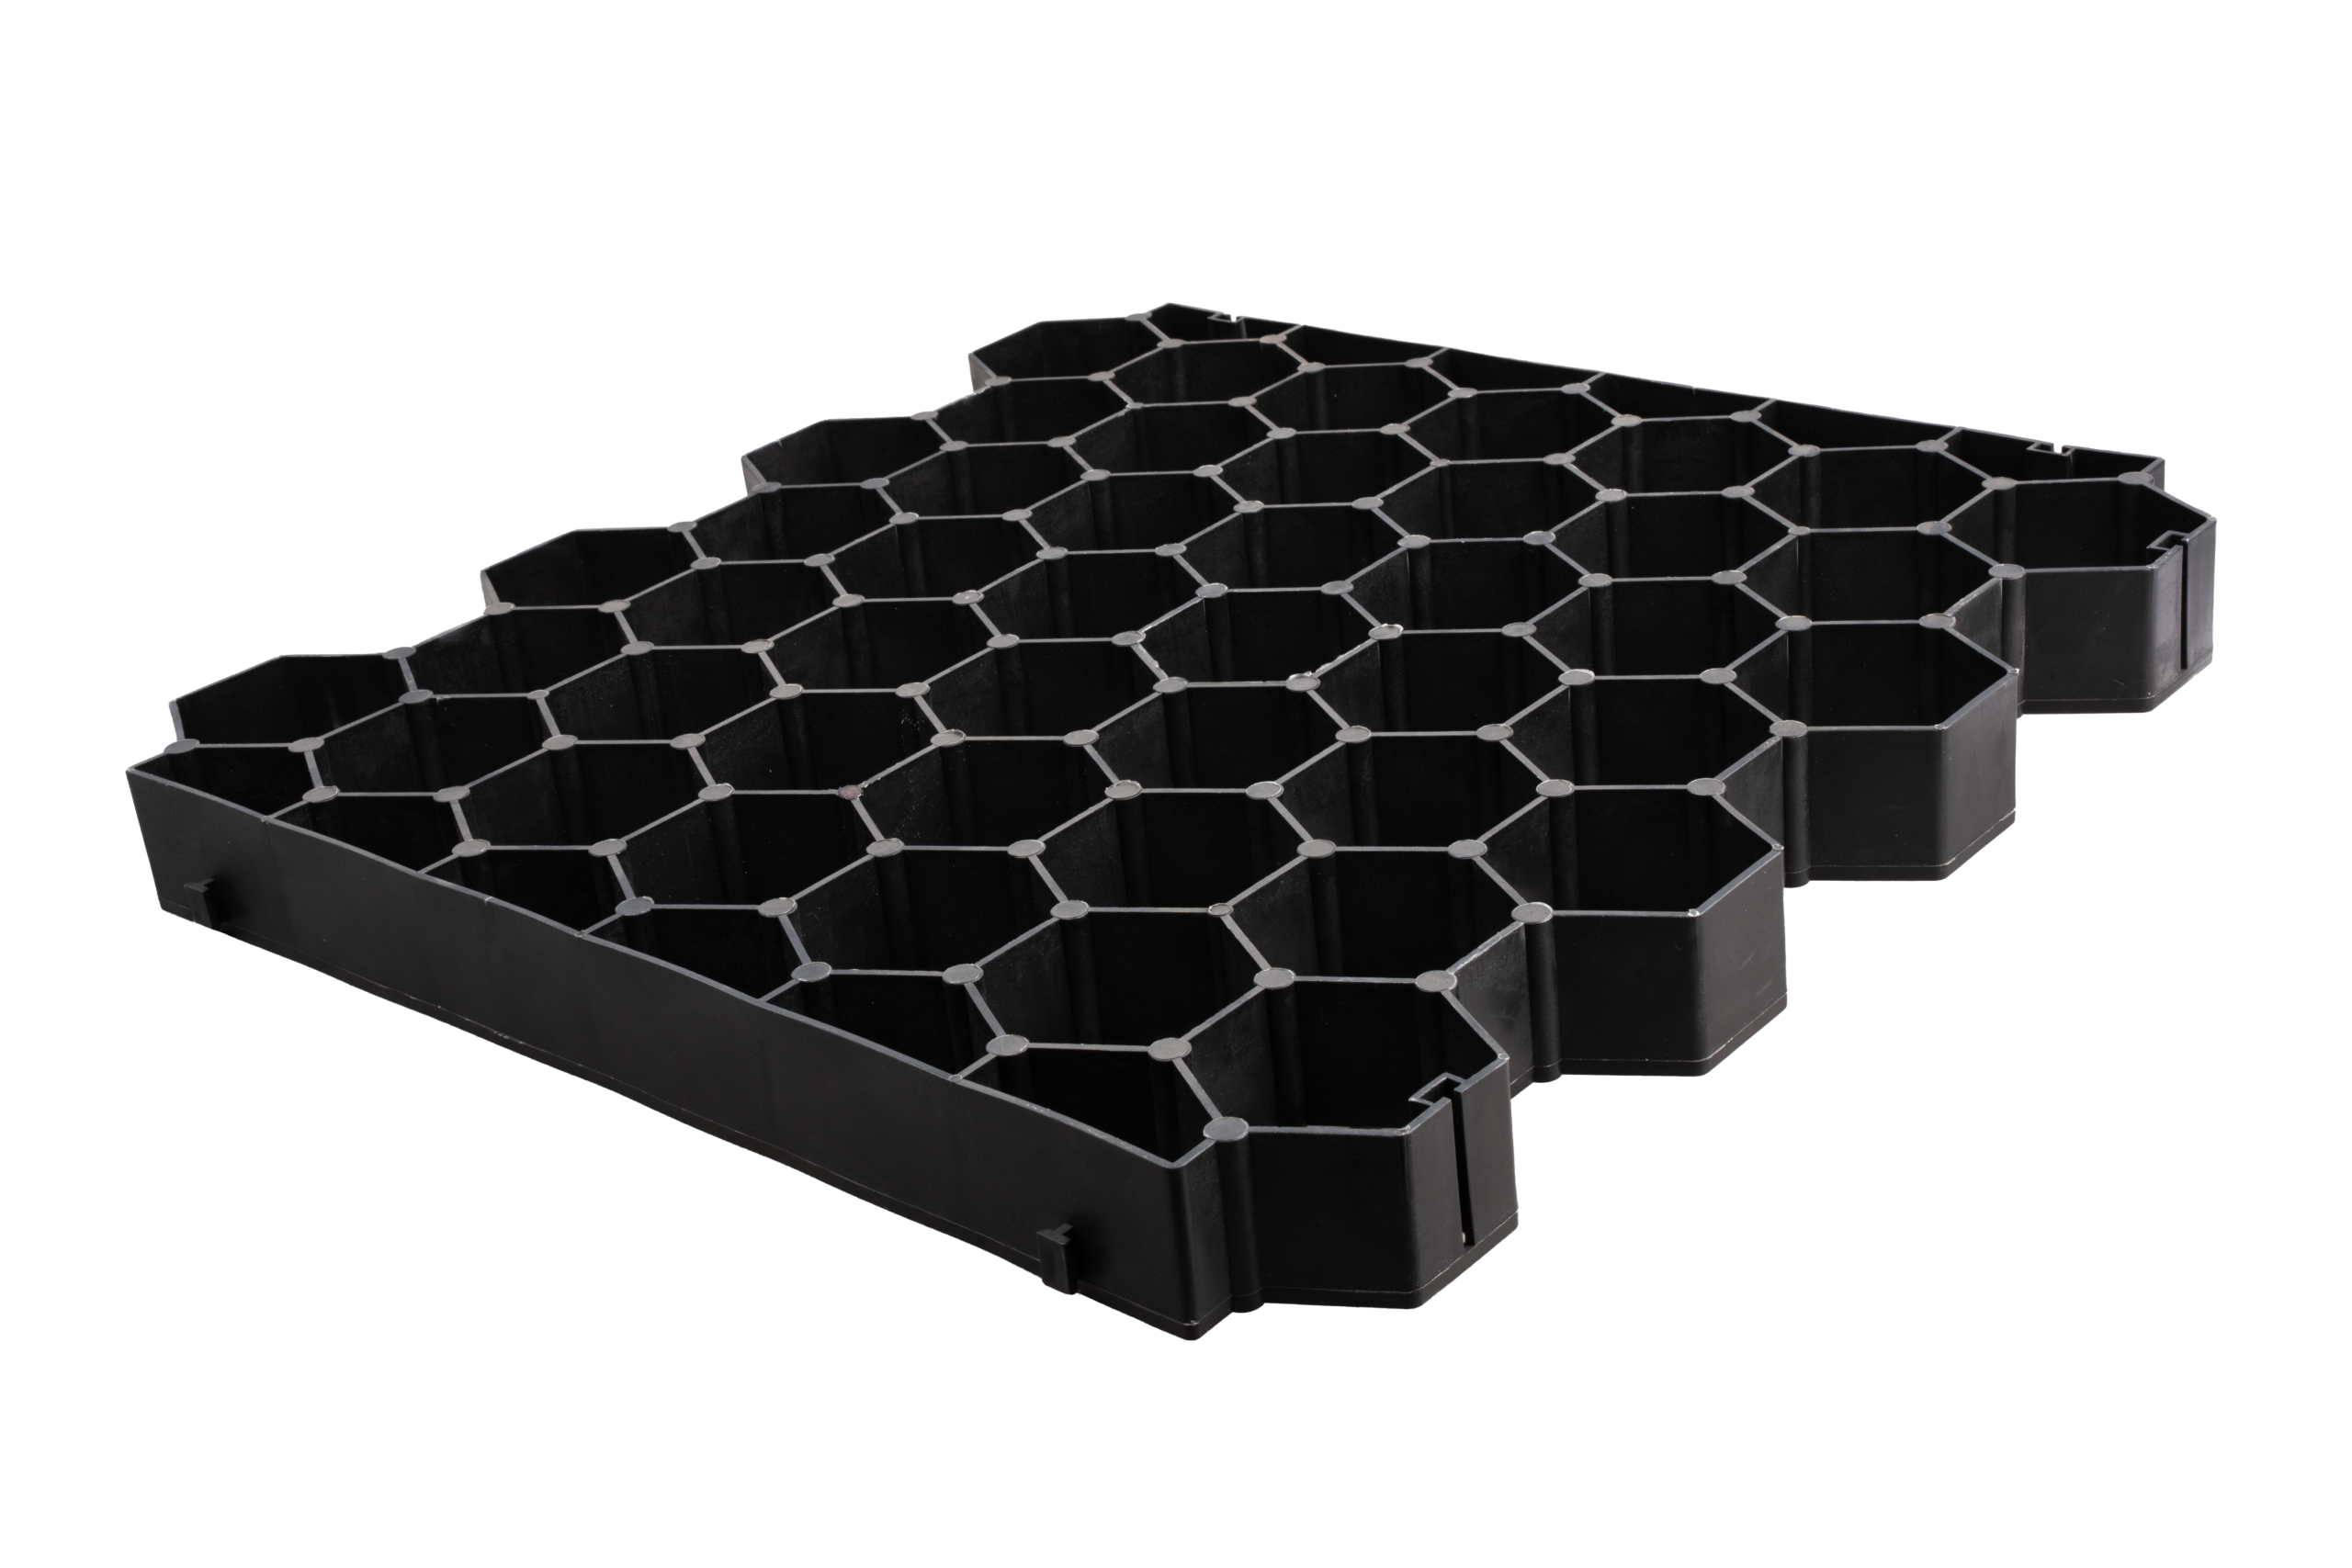
Hexabase™
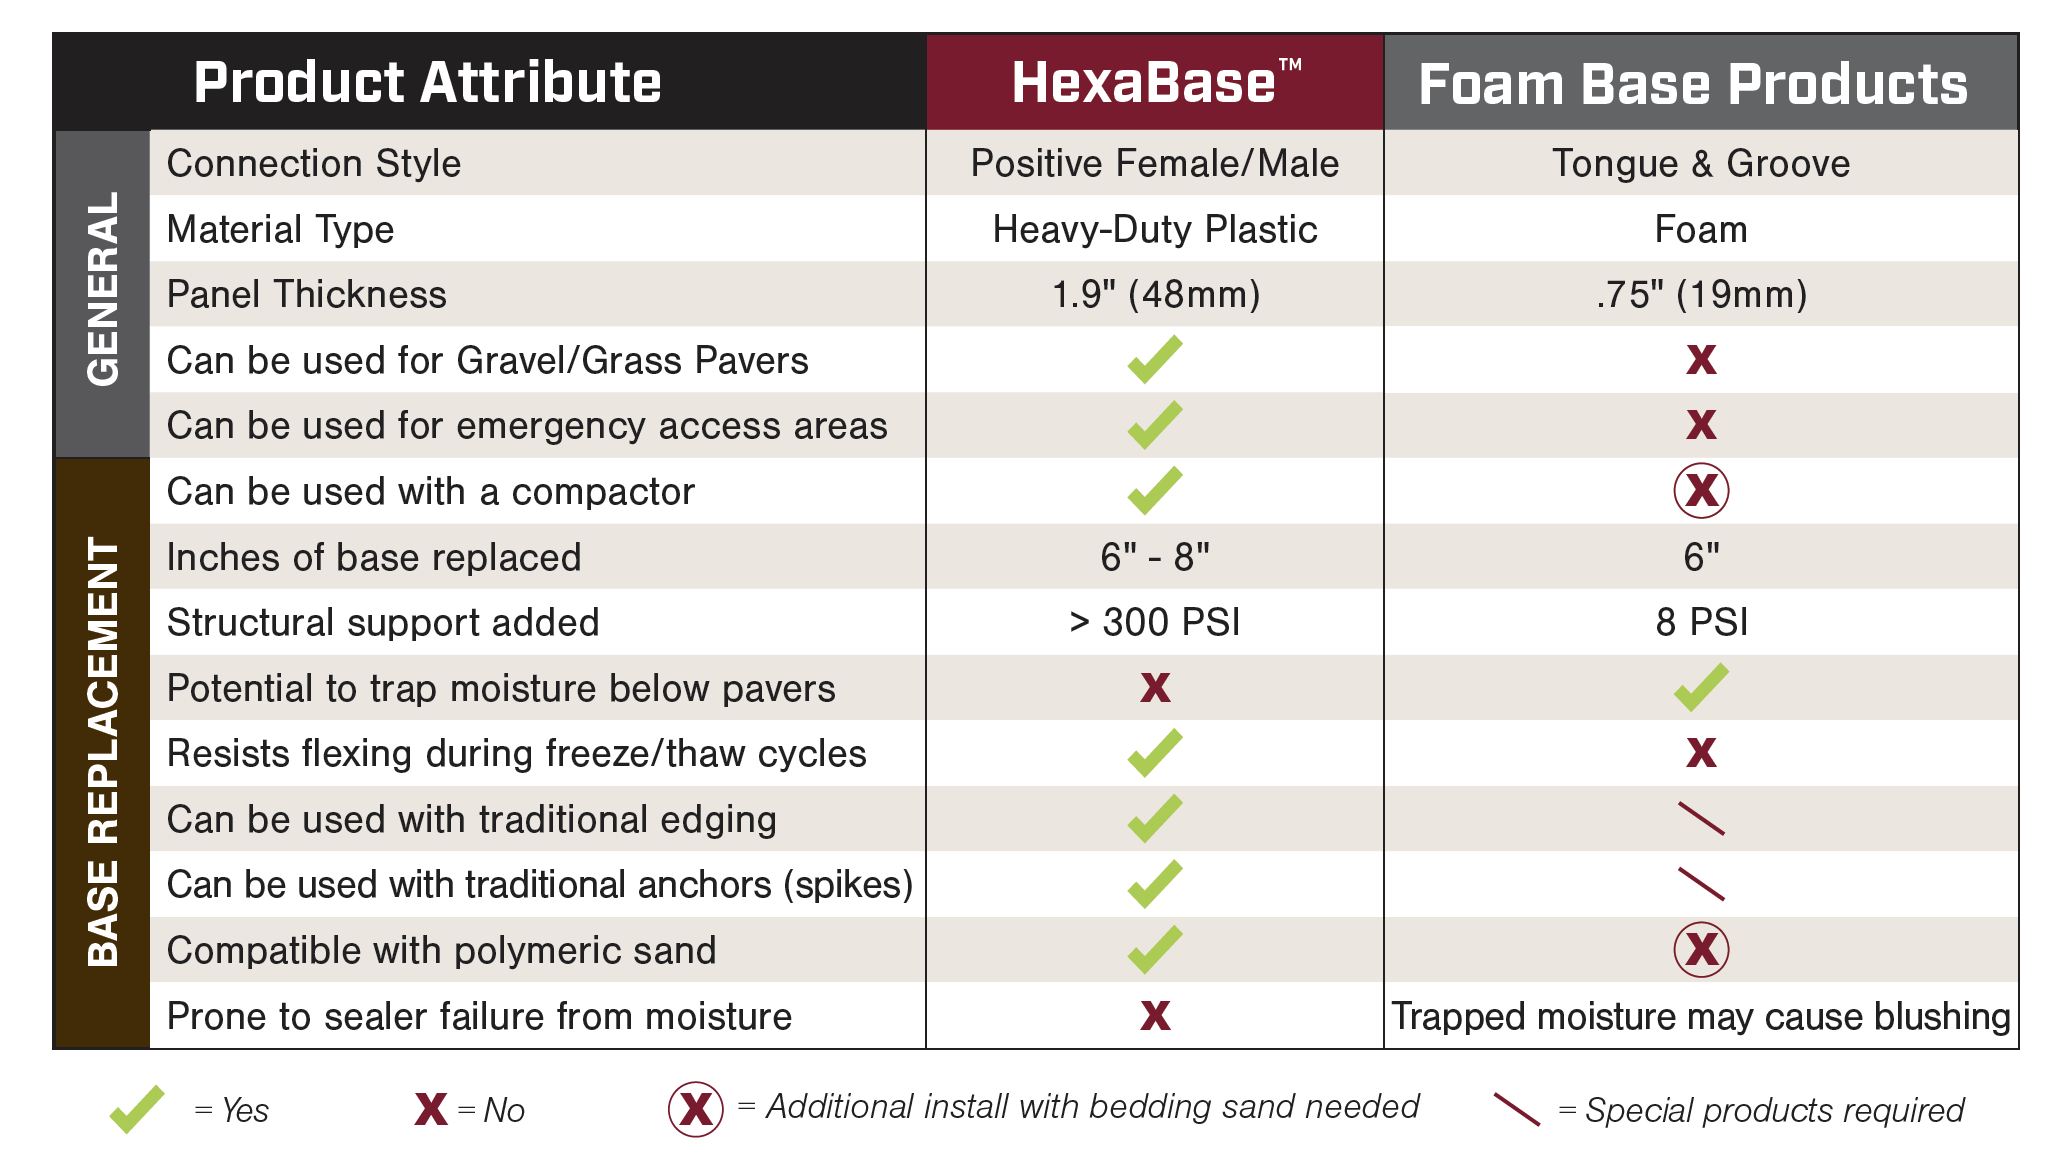
Hexabase™ is a heavy duty HDPE interlocking base replacement panel for patios, walkways, gravel driveways, and grass pavers. The lightweight panels are 30x stronger than foam base panels and are suitable for emergency access lanes.
- 100% Permeable: will not trap moisture like similar foam-based products
- 30x Stronger than Foam Base Panels
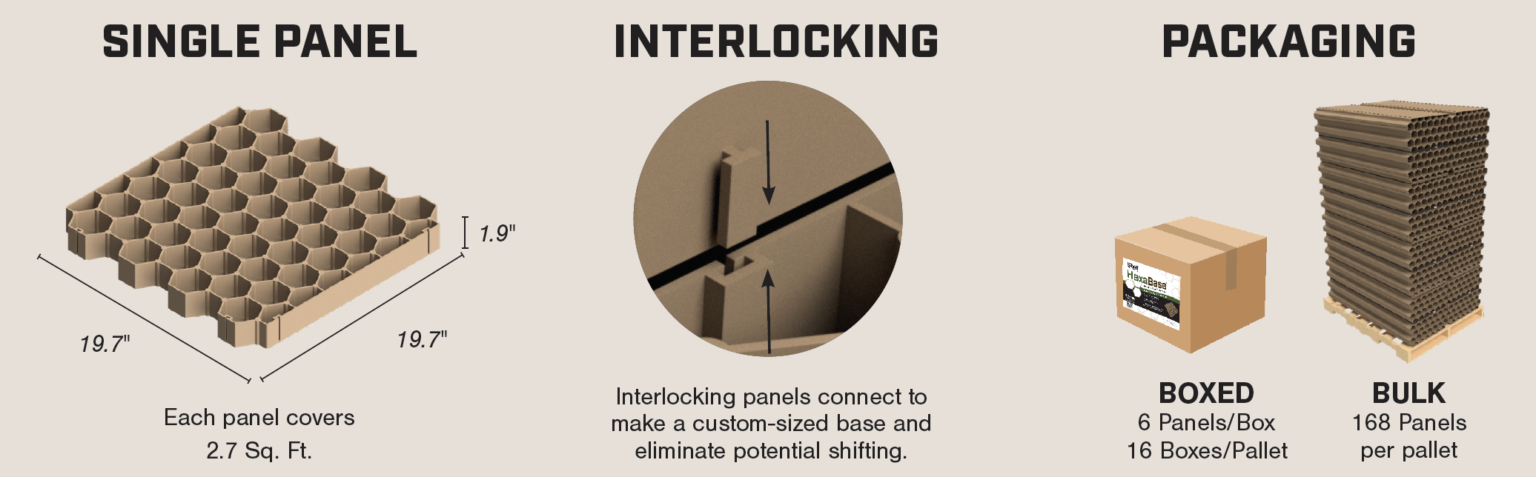
- Interlocking panels make a custom sized base reinforcement
- Designed to be used with traditional edging and spikes
- Resistant to flexing during freeze/thaw cycles
- Follows and conforms to standard guidelines for paver installations
- No Special Accessories Needed
- Save Up to 75%* on Fill Material Costs
- Save Up to 50%* on Excavation Costs
- Dimensions: 19.75″ x 19.75″ x 1.9″ to cover 2.7 sq. ft.
*Approximate, savings will vary depending on location/area & soil quality.
- Standard Paver Installations
- Overflow Grass Parking Area
- Barn Floor Erosion Control
- Golf Course Cart Paths
- Hiking Trail Slope Stabilization
- Feedlot Erosion Control
- Fire Access Lanes
- Grass/Gravel Driveways
HexaBase™ | Base Replacement
| PART NUMBER | SIZE | TOTAL SQ FT | QUANTITY |
| GSRW HB CTN | 6/BNDL | 16.15 | 28 BNDL/PLT |
| GSRW HB BULK | 1 | 452.2 | 168 PCS/PLT |
Why Hexabase™?
- STORMWATER MANAGEMENT
- Most parking lot designs will require a detention pond for stormwater management. Hexabase™ could remove the need for a retention pond, saving you time and money in several ways.
- LESS MAINTENANCE
- Keep cart paths looking pristine at a golf course. Avoid sealcoating an asphalt parking lot every three years. Stop potholes and mud issues in a small business lot.
- HIDDEN FUNCTIONALITY
- Create an extra parking spot at your house with the appearance of grass. Hide a required fire apparatus lane with a stabilized grass route.
- COST SAVINGS
- No cost for paving material. Much less stormwater management required. Reduced ground maintenance. Lower change for pavers settling, requiring new polymeric sand.
CONTRACTORS: If you are a contractor looking to try one of our products, click here for a dealer in your area, or click here to connect with your local sales rep for a demo.
DEALERS: If you are a dealer looking for an in-store demo or to bring a product in, click here to find your local sales rep.
HOMEOWNERS: If you are a homeowner, click here to find a dealer in your area.
HexaBase™ Instructions
PAVER APPLICATIONS
-
Minimum Excavation
- Survey out the area where the patio or walkway will go. The overall size of excavation will be 6″ larger on each side than the final paved project, except along structures or foundations.
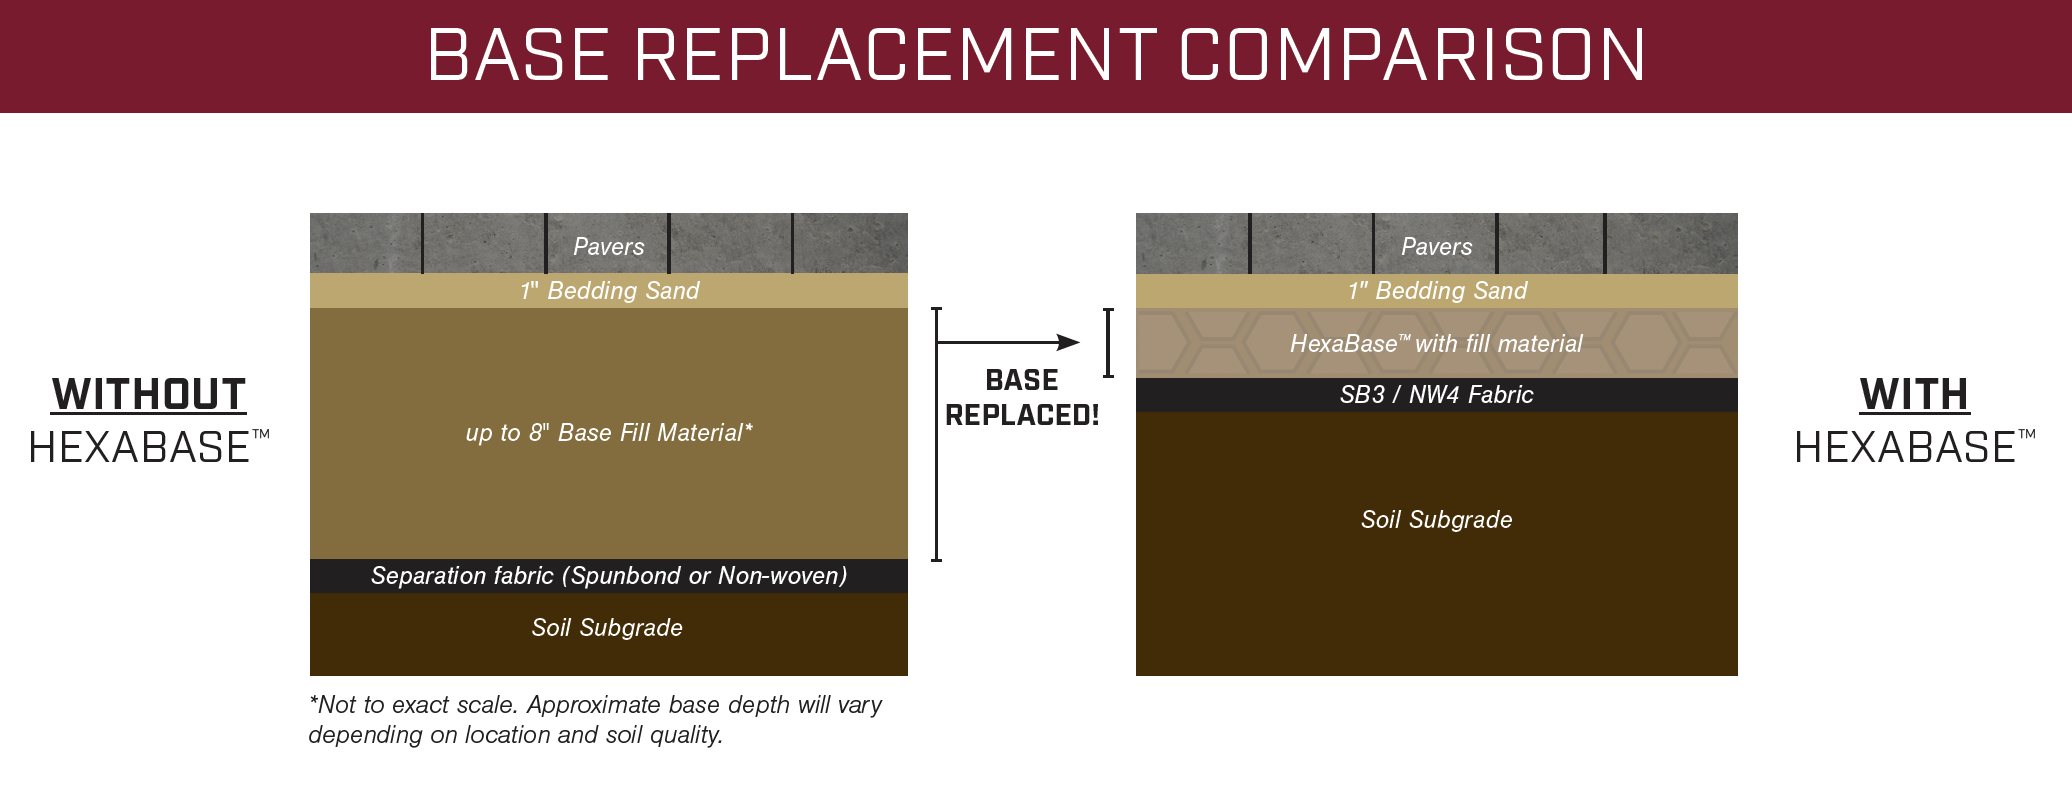
- Total excavation depth will be determined by the overall height of the paver or chosen surface. To calculate the depth needed, simply add 2 5/8″ to the thickness of the paving materials (pavers, natural stone, wetcast, etc.).
- This measurement takes into consideration the thickness of the Hexabase panels and the 1″ layer of bedding sand (bedding sand will compact to approximately 5/8″ – 3/4″ after paver installation is complete).
- Excavate area to the total depth calculated above, ensuring the area remains flat and properly sloped for water drainage away from structures.
-
Prepare the Soil Subgrade (Native Soil)
- Compact the Soil Subgrade with overlapping passes using a plate compactor. Be sure to compact perpendicular to the original direction as well.
- Frequently check the area to ensure the Soil Subgrade remains flat and properly sloped during compaction, raking soil into low areas as needed and re-compacting until satisfied.
-
- Roll out the desired SRW Products separation fabric (SB3 or NW4) on top of the excavated area, allowing edges to run up the sides 2″, and overlap 12-18″ at the seams. This layer is crucial to the long-term performance of the system and will keep the Soil Subgrade from migrating into and contaminating the Compacted Aggregate fill material in the HexaBase™ cells.
- Pull the fabric taught, removing folds or wrinkles, and secure using staples.
-
Installation
- Starting in a corner, lay HexaBase™ panels directly on top of the Separation Fabric (SB3 or NW4) over the entire excavated area. Be sure to fully lock each panel to the adjacent panels before continuing on.
- Trim any panels around the edges to correct size using a handsaw, circular saw or similar tool.
- Using a permeable, compactable base material (3/4″ minus, crushed Limestone, Quarry Process Stone, or other equivalent base aggregate), fill the cells of the HexaBase™ slightly over the top of the cell walls (1/8 – 1/4″) uniformly across the area.
- Use plate compactor in several directions to compact base material into cells. Refill cells where necessary with base material and repeat compaction until cells are completely full.
- Place 1″ screed pipes or rails directly on the panels and spread bedding sand over them.
- Bedding sand under concrete pavers should conform to ASTM C33 OR CSA A23.1.
- Carefully screed bedding sand using a straight board to a uniform 1″ thickness across entire area.
-
- Install paved surface according to manufacturer recommendations.
-
Edging
- HexaBase™ is specifically designed to use traditional edging products and spikes.
- Be sure to use 10″ smooth or spiral spikes to secure edging around the paved surface.
- When installing edging, ensure spikes are being driven into aggregate filled cells at least 6″ from the edge of the HexaBase™ panels.
GRASS/GRAVEL GRID APPLICATION
- Prepare area by removing vegetation and leveling Soil Subgrade.
- Be sure to flatten out any high or low spots as needed and remove roots and large stones from the area.
- Starting in the corner of the project area, lay down HexaBase™ pieces, interlocking each one together firmly to the adjacent pieces. Be sure to lay each piece in the same orientation to ensure interlocking connectors mate properly.
- Repeat panel installation until entire area is covered and all panels are interlocked together.
- GRAVEL FILL: Fill panels to the top of the cells with desired aggregate. Lightly compact over the grid with a plate compactor to settle aggregate into the cells.
- GRASS FILL: Fill panels to the top of the cells with soil and seed. Do NOT compact the soil into the grid as rain will naturally compact soil in the cells to the appropriate level.
- HexaBase™ Grass Paver installations can be used with conventional seeding, hydroseeding, and sod applications.
- GRASS/GRAVEL GRID APPLICATION BENEFITS
- Provides the structural integrity of a traditional aggregate base while keeping the look of plush lawn.
- Grass pavers create an environmentally friendly surface that allows water migration through the system as opposed to run-off.
- Quick and Easy solution to overflow or seasonal parking situations.
- Great for trails and pathways used by golf carts and utility vehicles to eliminate rutting and mud after rain events.
GRASS/GRAVEL DRIVEWAY APPLICATION
-
MINIMUM EXCAVATION
- Survey out the area. The overall size of excavation will be 6″ larger on each side than the final project, except along structures or foundations.
- Total excavation depth will be determined by the overall height of the chosen surface.
- To calculate the depth needed, simply add 5.9″ to the thickness of the desired paving material (grass or gravel).
- This measurement takes into consideration the thickness of the HexaBase™ panels (1.9”) and the compacted base material (4”).
- Excavate area to the total depth calculated above, ensuring the area remains flat and properly sloped for water drainage away from structures.
-
PREPARE THE SOIL SUBGRADE (NATIVE SOIL)
- Compact Soil Subgrade with overlapping passes using a plate compactor. Be sure to compact perpendicular to the original direction as well. Frequently check the area to ensure the Soil Subgrade remains flat and properly sloped during compaction, raking soil into low areas as needed and re-compacting until satisfied.
-
- Roll out the stabilizing separation fabric, SS5 Woven by SRW Products, on top of the excavated area, allowing edges to run all the way up the sides of the excavated areas. Overlap 18-24″ at the seams. This layer is crucial to the long-term performance and durability of the system and will keep the Soil Subgrade from migrating into and contaminating the Compacted Aggregate fill material in the HexaBase™ cells.
- Pull the fabric taught, removing folds or wrinkles, and secure using staples. Install the 4” of standard base, level and compact.
-
INSTALLATION
-
Starting in the corner of the project area, lay down HexaBase™ pieces, interlocking each one together firmly to the adjacent pieces. Be sure to lay each piece in the same orientation to ensure interlocking connectors mate properly.
-
Repeat panel installation until entire area is covered and all panels are interlocked together.
-
To create curves, cut HexaBase™ panels using a skill saw with a turbo rimmed diamond blade. This blade will not grab or tear the panels from your hands.
-
-
FILL
- GRAVEL FILL: Fill panels to the top of the cells with desired gravel. Lightly compact over the grid with a plate compactor to settle aggregate into the cells.
- GRASS FILL: Fill panels with a layer of sand and then a layer of soil and seed. Do NOT compact the soil into the grid as rain will naturally compact soil in the cells to the appropriate level.
- HexaBase™ Grass Paver installations can be used with conventional seeding, hydroseeding, and sod applications.
Video
SRW Hexabase™ is easy to install and requires no additional equipment. Our base replacement is specifically designed to use traditional edging products and spikes to best suit your hardscape and landscape projects.Related products
Where can I buy HexaBase?
Do you have additional questions? Contact us.