Pavermate Z3™ Polymeric Sand
At SRW Products, our Pavermate Z3™ provides fast, powerful, and long-lasting results for a variety of paver applications. Our one-sand solution for paver joints ensures clean, rain-safe installation with quick set-up. As the best polymeric sand on the market, you can expect zero haze or dust, strong joints, and longevity.
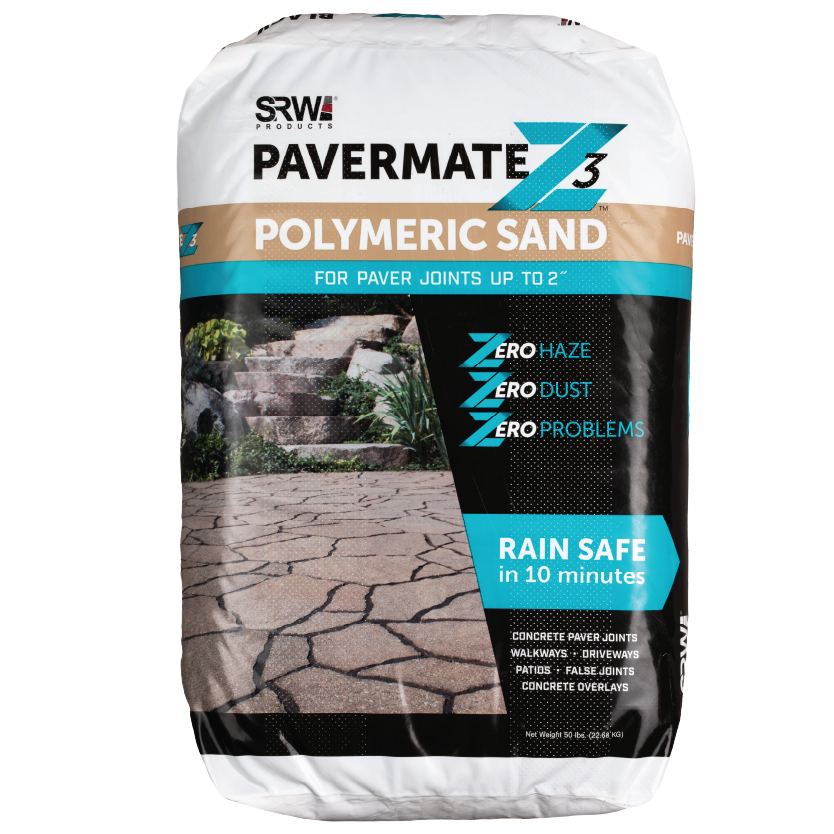
- Zero Haze: Clear polymer technology, along with the removal of Portland, Fly Ash & Crushed Limestone (which are ingredients that cause hazing) set you up for a haze-free project.
- Zero Dust: Specifically mixed to bind polymers and sand, reducing fines and creating a dust-free product.
- Zero Problems: Rain safe in just 10 minutes. Fastest set up time in the market helps with unforeseen weather.
- Concrete Pavers
- Driveways
- Pool Decks
- Walkways
- Patios
- False Joints
- Concrete Overlays
- Non-Overlays
- Paver Joints up to 2˝
PAVERMATE Z3™ Polymeric Sand • Joints up to 2˝
| PART NUMBER | COLOR | SIZE | QUANTITY |
| SSAN PAVZ3 TAN | TAN | 50 LB BAG | 49 BAGS/PLT |
| SSAN PAVZ3 GRA | GRANITE | 50 LB BAG | 49 BAGS/PLT |
| SSAN PAVZ3 BLK | BLACK | 50 LB BAG | 49 BAGS/PLT |
| SSAN PAVZ3 IVY | IVORY | 50 LB BAG | 49 BAGS/PLT |
| SSAN PAVZ3 BEIGE* | BEIGE | 50 LB BAG | 49 BAGS/PLT |
*Region specific, ask Customer Service or your Territory Sales Representative for more information
CONTRACTORS: If you are a contractor looking to try one of our products, click here for a dealer in your area, or click here to connect with your local sales rep for a demo.
DEALERS: If you are a dealer looking for an in-store demo or to bring a product in, click here to find your local sales rep.
HOMEOWNERS: If you are a homeowner, click here to find a dealer in your area.
Pavermate Z3™ Instructions
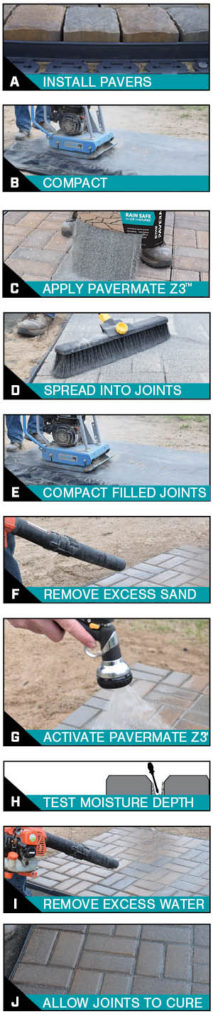
Preparation
- Install pavers using manufacturer’s guidelines for bedding, leveling and installation. Fully clean off debris from the project area.
- Installations should have a proper drainage layer of sand with a depth of 1″ (2.54 cm). In addition, weep holes need to be added to concrete overlays.
- If it’s an existing project, properly clean out joints before applying polymeric sand and skip to step 2.
- Compact pavers thoroughly using a rubber-plated compactor.
- If compactor is not rubber-plated, cover pavers with a woven fabric while compacting to help protect paver surface from damage.
- Pavers must be completely dry before installing polymeric sand. Wait 24 hours after rain.
- Install pavers using manufacturer’s guidelines for bedding, leveling and installation. Fully clean off debris from the project area.
Application
- Gently tumble the bag, then cut the bottom and apply Pavermate Z3™ evenly over the surface.
- Sweep sand diagonally into joints, completely filling to the full depth of the pavers.
- Avoid pushing sand over long distances.
- Remove excess sand from the surface of the pavers before compacting.
- Compact filled joints using a rubber-plated compactor.
- Repeat A-C if sand drops 1/4″ (0.635 cm) or more from paver surface after compaction.
- If using with open-graded base coverage will be reduced.
- Remove excess sand from the paver surface using a soft bristle broom and set the joint height with a leaf blower on idle.
- Once complete, joint height should be filled to 1/8″ (0.32 cm) below the top of the paver.
Activation
- Working in sections up to 200 sq. ft. (18.58 sq. m.), water the section for a total of 2 minutes using all the applications of water below. Do not allow the section to dry during the 2 minute watering.
- MIST: Use a hose with a sprayer attachment set to “mist” or similar light setting. Mist the area until the surface is wet.
- SHOWER: Immediately switch to “light shower” setting. When water pools in areas, move to a new spot or let soak before adding more, throughout the entire 2 minutes.
- Use a screwdriver to test for proper moisture depth of at least 1″ (2.54 cm). If moisture depth is not achieved, immediately wet the area with a shower setting.
- Once moisture depth is achieved, blow off excess water using a leaf blower.
- Working in sections up to 200 sq. ft. (18.58 sq. m.), water the section for a total of 2 minutes using all the applications of water below. Do not allow the section to dry during the 2 minute watering.
Curing
- Pavermate Z3™ is rain-safe in 10 minutes after joint activation.
- A flexible joint is a sign that a reaction has occurred but is not completely cured.
- A dry environment is important to allow joints to fully cure. For best performance, install when no rain is forecasted for 24 hours.
- Wait 28 days prior to cleaning or sealing.
- Pavermate Z3™ is rain-safe in 10 minutes after joint activation.
User Tips
- JOINT SIZE/TYPE
- Joint Width: Recommended for joints between 1/16″ to 2″ (0.16 cm to 5.08 cm) at intersecting points. For concrete overlays, a maximum of 1″ (2.54 cm) wide joints at intersecting points is recommended.
- Joint Depth: Minimum depth of 1 ½” (3.81 cm).
- COVERAGE
- Narrow Joints: Typical coverage is 55 – 75 sq. ft. (5.11 – 6.97 sq. m.) per bag.
- Wide Joints: Typical coverage is 20 – 30 sq. ft. (1.86 – 2.79 sq. m.) per bag.
- INSTALLATION
- Test in a small discrete area.
- Temperatures must remain above 32°F (0°C) throughout installation and curing.
- Not recommended for flagstone patios, porcelain, or wet/heavily shaded areas. Do not use on pool copings.
- Clay pavers must be completely dry prior to sand install. Moisture in the clay pavers can activate the sand on the surface and leave a residue.
- Proper compaction is very important for obtaining optimal joint strength.
- Continuous dampness can prevent polymeric sand from curing properly. Irrigation systems should be turned off until polymeric sand has fully cured.
- For best results, wait 28 days after installation before cleaning and sealing.
- JOINT SIZE/TYPE
Video
Our Pavermate Z3™ is the best polymeric sand for paver joints and other exterior surfaces. Expect zero haze, zero dust, and zero problems with our rain-safe and versatile hardscape sand.
Related products

Where can I purchase Pavermate Z3?
Can I install polymeric sand on a paver patio that already had polymeric sand installed?
What is the recommended way to remove polymeric sand between pavers?
We recommend removing polymeric sand by using a pressure washer to blow out the sand from the joints. When blowing out sand from the joints start on one side and work from one side to the other. The reason for this is so the sand that is being removed won’t fill in the areas that have been previously blown out.
How can residue from polymeric sand be removed from the surface of a paver?
We recommend removing it using a heated pressure washer. Avoid allowing the pressure washer to hit the joints directly. Focus on just the paver surface. Once that is completed, we recommend the use of SRW PW Paverwash to clean the surface of the paver.
If SRW Polymeric Sand is installed on my commercial patio, will it be safe for someone wearing high heels to walk on the joints?
Once fully cured, our polymeric sands will be strong enough to withstand someone wearing high heels to walk across the joints.
Can a project be sealed after polymeric sand has been installed?
Once the Polymeric sand has cured for at least 28 days, you can clean and seal over the top of the project. We recommend cleaning the paver surface with PW Paver Wash prior to applying any SRW Sealer. We recommend cleaning a stone surface with SW Stone Wash and wetcast projects to be cleaned with WW Wetcast Wash.
Do you have additional questions? Contact us.