X-Treme™
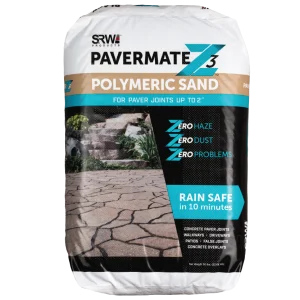
At SRW Products, our X-Treme™ Polymeric Sand is an excellent choice for hardscapes featuring wide joints. Our advanced polymer technology provides X-Treme™ with a stronger and more durable cure, making it the top option for natural stone and wetcast patios and walkways. Specifically designed for wide joint applications, up to 6 inches, it is the ideal polymeric sand for natural stone hardscapes. Additionally, it sets rain-safe in just 20 minutes, making it the fastest wide-joint setup available on the market.

- Wide Joints
- Rain Safe in 20 Minutes
- No Haze due to advanced polymer technology
- Strong, Solid Joints
- Long-Lasting to prevent washout and weeds
- Available in tan and granite colors.
- Joints up to 6˝
- Pool Decks
- Walkways
- Patios
- Wetcast
- Natural Stone
| PART NUMBER | COLOR | SIZE | QUANTITY |
| SSAN XTRTAN | TAN | 50 lb BAG | 49 BAGS/PLT |
| SSAN XTRGRA | GRANITE | 50 lb BAG | 49 BAGS/PLT |
CONTRACTORS: If you are a contractor looking to try one of our products, click here for a dealer in your area, or click here to connect with your local sales rep for a demo.
DEALERS: If you are a dealer looking for an in-store demo or to bring a product in, click here to find your local sales rep.
HOMEOWNERS: If you are a homeowner, click here to find a dealer in your area.
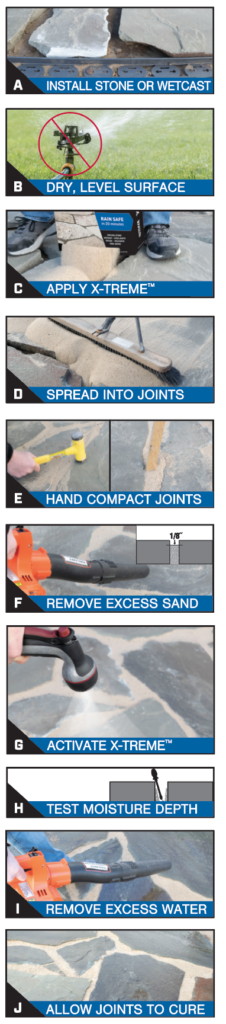
X-Treme™ Instructions
Preparation
- Install stone or wetcast using manufacturer’s guidelines for bedding, leveling and installation. Fully clean off debris from the project area.
- Installations should have a proper drainage layer of sand with a depth of 1″ (2.54 cm).
- Stones or wetcast should be level and stable prior to application.
- See user tips for recommended application temperatures & joint widths/depths.
- Surface must be completely dry. Wait 24 hours after rain before application.
- Irrigation systems should be turned off until polymeric sand has fully cured.
- Install stone or wetcast using manufacturer’s guidelines for bedding, leveling and installation. Fully clean off debris from the project area.
Application
- Gently tumble the bag, then cut the bottom and apply sand evenly over the surface.
- Spread sand into joints, completely filling to the full depth of the stone or wetcast.
- For natural stone, spread the sand evenly over the project surface, then sweep into joints until the full depth of the joint is filled. Avoid moving sand over long distances as this could separate the polymers.
- For wetcast, pour the sand directly into the joints. Avoid getting sand on the surface.
- Use a rubber mallet along the edge of stones or wetcast to settle the sand.
- For natural stone, use a small blunt object to compact joints in more open areas. If sand becomes low, fill with additional sand and compact again.
- Stones or wetcast should be firm with no movement.
- Remove excess sand from the surface using a soft bristle broom and set joint height with a leaf blower on idle.
- Once complete, joint height should be filled to 1/8″ (.32 cm) below the top of stones or wetcast. This allows water to migrate from the surface into joints.
Activation
- Working in sections up to 100 sq. ft. (9.29 sq. m.), water each section for a total of 2 minutes. Do not allow the section to dry during the 2-minute watering:
- MIST: Use a hose with a sprayer attachment set to “mist” or a similar light setting. Mist the area until the surface is wet.
- SHOWER: Next, set the hose to “light shower” to allow more water over the area. Repeat the shower two times over the section.
- Use a screwdriver to test for proper moisture depth of at least 1″ (2.54 cm). If depth is not achieved, immediately wet the area with a shower setting.
- Once moisture depth is achieved, blow off excess water using a leaf blower.
- Working in sections up to 100 sq. ft. (9.29 sq. m.), water each section for a total of 2 minutes. Do not allow the section to dry during the 2-minute watering:
Curing
- Rain safe 20 minutes after joint activation.
- A flexible joint is a sign that a reaction has occurred but is not completely cured. A dry environment is important to allow joints to cure fully.
- For best performance, install when no rain is forecasted for 24 hours.
- Wait 28 days prior to cleaning or sealing.
- Rain safe 20 minutes after joint activation.
User-Tips
- JOINT SIZE/TYPE
- Joint Width: Recommended for joints between 1/4″ to 6″ (.64 cm to 15.24 cm) at intersecting points.
- Joint Depth: Minimum depth of 1 ½” (3.81 cm).
- COVERAGE
- Coverage varies based on joint width. Typical coverage is 20 – 45 sq. ft. (1.85 – 4.18 sq. m.) per bag.
- WEATHER
- Ensure that no rain is forecasted for at least 24 hours before and after installation.
- After activation, cover the area entirely if there’s a possibility of rain and promptly uncover it once the threat has passed.
- Temperatures must remain above 32°F (0°C) throughout installation and curing.
- INSTALLATION
- Test in a small discrete area.
- Temperatures must remain above 32°F (0°C) throughout installation and curing.
- Not recommended for concrete overlays, pavers, clay pavers, or wet/heavily shaded areas. Do not use on pool copings.
- Proper compaction is very important for obtaining optimal joint strength.
- Continuous dampness can prevent polymeric sand from curing properly. Irrigation systems should be turned off until polymeric sand has fully cured.
- For best results, wait 28 days after installation before cleaning and sealing.
- JOINT SIZE/TYPE
Video
SRW SF-8™ can handle your the powerful materials during your hardscape and landscape projects while saving you time and money.

Where can I purchase X-Treme?
Can I install polymeric sand to a paver patio that already had polymeric sand installed?
What is the recommended way to remove polymeric sand between stones?
If SRW polymeric sand is installed on my commercial patio, will it be safe for someone wearing high heels to walk on the joints?
Can a project be sealed after polymeric sand has been installed?
Do you have additional questions? Contact us.